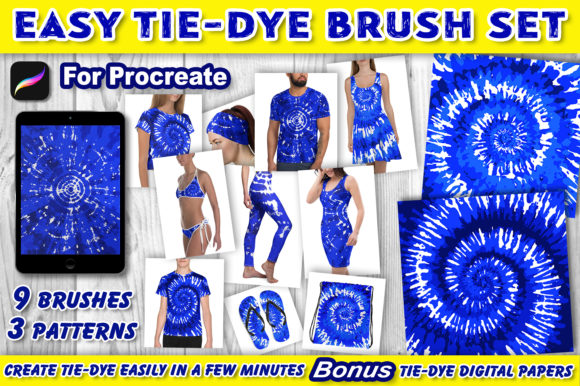
Mastering Vibrant Textures with Tie-Dye Patterns Brushes for Procreate
Digital art has evolved to a point where texture is just as important as composition. For artists seeking that organic, fluid look of fabric dye without the mess of water and rubber bands, Tie-Dye Patterns Brushes for Procreate offer a compelling solution. This specific toolset, comprising nine distinct brushes housed in a single zip file, is designed to streamline the creation of complex, layered psychedelic designs. However, simply downloading a brush set does not guarantee a masterpiece. Many creators, from hobbyists to professional marketers, fall into the trap of treating digital stamps like traditional paint, leading to flat, unconvincing results. Understanding the mechanics of this specific three-pattern system is crucial for unlocking its full potential.
The core appeal of these Tie-Dye Patterns Brushes for Procreate lies in their structured approach to chaos. Unlike generic texture brushes that rely on a single stroke to do all the work, this set requires a methodical layering process. The package includes three unique tie-dye patterns, and critically, each pattern is broken down into three specific brushes varying in size and shape. This means you are receiving a total of nine specialized tools: Tie-Dye 1-1, 1-2, 1-3; Tie-Dye 2-1, 2-2, 2-3; and Tie-Dye 3-1, 3-2, 3-3. A common misunderstanding among beginners is assuming these are interchangeable or that using just one will yield the final effect. In reality, the magic happens only when all three components of a specific pattern number are combined correctly.
Avoiding the Single-Layer Pitfall
One of the most frequent errors users make when first installing this set is attempting to build the entire design on a single layer. Because these are stamp brushes, applying them directly over one another on the same canvas layer can muddy the colors and destroy the crisp edges of the dye spread. When you tap the screen to apply the stamp, the pixel data merges immediately. If you apply Brush 1-2 over Brush 1-1 on the same layer, you lose the ability to adjust the opacity, blend mode, or position of the individual elements later.
To avoid this, always adopt a non-destructive workflow. Create a new layer for each brush application. This practice ensures that if the spiral of your second stamp doesn't align perfectly with the first, you can nudge it without redoing the entire background. It also allows you to experiment with different blending modes like "Multiply" or "Overlay" for specific layers to enhance the depth of the dye simulation. Professionals know that flexibility during the editing phase is what separates a good design from a great one.
The Critical Importance of Layer Order
Perhaps the most overlooked detail in the instructions for these brushes is the specific order in which they must be stacked. The prompt explicitly states that for a perfect tie-dye pattern, the arrangement is key. A significant mistake occurs when users place the base stamp (Number 1) on top of the detail stamps (Numbers 2 and 3). Visually, this reverses the logic of how dye penetrates fabric. The largest, foundational shape should anchor the design, while the smaller, more intricate shapes add the surface variation.
For optimal results, adhere to this hierarchy: Brush number 2 and 3 must always be above the background layer, but Number 1 must serve as the foundation relative to the specific pattern logic. Typically, you want the broadest coverage at the bottom of your layer stack (just above your solid color background) and the finer details on top. If you find your pattern looking disjointed or lacking cohesion, check your layers panel immediately. Reordering the stack so that the "-1" brush supports the "-2" and "-3" brushes often instantly resolves the visual disconnect.
Maximizing Efficiency with the Included Assets
Beyond the brushes themselves, this zip file includes a valuable bonus: three high-resolution digital papers sized at 12x12 inches with 300 DPI. These JPG files are ready for print-on-demand services or social media graphics. A common error is ignoring these pre-made backgrounds in favor of creating custom ones from scratch every time. While customization is excellent, starting with a provided 300 DPI background ensures your final output meets industry standards for printing. Using a low-resolution background with high-quality brushes will result in a pixelated final image, negating the quality of the brush strokes.
When utilizing the commercial use license included with this set, remember that consistency is key for branding. If you are an entrepreneur selling t-shirts or tote bags, use the same pattern combination across your product line but vary the color palettes. The brushes are named clearly (e.g., Tie-Dye 2-2), making it easy to replicate a specific look for a client revision. Do not rely on memory; keep a notes layer in your Procreate file documenting which brush numbers created the approved design.
Five Steps to Flawless Execution
To ensure you are getting the most out of your purchase and avoiding the frustration of poor results, follow this streamlined workflow. This process corrects the common issues of muddied colors and disorganized layers:
- Setup Your Canvas: Create a new artboard in Procreate. Choose a solid color for your background layer. If you plan to print, ensure your canvas dimensions match the included 12x12 inch bonus papers or your specific product requirements.
- Layer Management: Add a new layer specifically for your first stamp. Select the "-1" brush from your chosen pattern set (e.g., Tie-Dye 1-1). Set your color to white or a light tint to test visibility, then tap once on the screen to apply the stamp.
- Build Complexity: Create another new layer above the first. Select the corresponding "-2" brush. Apply the stamp, ensuring it aligns with the underlying texture. Repeat this process for the "-3" brush on a third separate layer.
- Refine and Arrange: Review your layer stack. Ensure that the broader strokes (usually the -1 series) are positioned correctly relative to the finer details (-2 and -3). Adjust the opacity of the top layers if the pattern feels too heavy.
- Finalize: Once satisfied, you can merge these specific pattern layers if no further changes are needed, or keep them grouped for future edits. Apply your color adjustments using Procreate's Adjustment tools to simulate real dye saturation.
Making the Right Choice for Your Workflow
Before integrating Tie-Dye Patterns Brushes for Procreate into your daily routine, evaluate your current project needs. If you are looking for hand-painted, unpredictable watercolor bleeds, these stamp-based brushes might feel too structured. However, if you need repeatable, scalable patterns for merchandise, packaging, or web backgrounds, this set is superior. The predictability of the three-brush combination allows for rapid prototyping.
Additionally, verify your file management habits. Since the brushes come in a zip file, ensure you unzip the file completely before attempting to import it into the Procreate app. Trying to import directly from a compressed folder often leads to corrupted files or missing brushes. Once imported, take a moment to rename the brush set within Procreate to something easily searchable, preventing the frustration of scrolling through default libraries later.
By respecting the layering requirements, utilizing the high-resolution bonuses, and following the specific stamping order, you transform a simple download into a powerful asset. Whether you are a freelancer delivering assets to a client or a blogger creating eye-catching headers, mastering these nine brushes will elevate the texture and professionalism of your digital artwork.